Recently, Daniel Offer, Managing Director of Athena IT Limited wrote to us inviting us to write about their latest incarnation of Chit Chat for Facebook - a port of their popular Windows application to the Blackberry. You've probably heard of their Facebook chat desktop application for Windows, and this Facebook Blackberry IM app according to the company is intended to be the "bigger and better brother app" for Blackberry Smartphones.
Intrigued, I paid out my $1.99 and purchased a copy of Chit Chat for Facebook for my cherished Blackberry Bold 9780. I was eager to see if the Facebook Blackberry chat app matches the hype - and well, the picture perfect official Chit Chat for Facebook Blackberry website.
Once purchased, Chit Chat was awaiting me in my "downloads" folder on my Blackberry - the icon will be familiar to users of the desktop Windows application and is basically two pacman like C's standing for Chit Chat. After going through the normal software rigmarole of choosing my desired language and accepting an End User License Agreement I was asked to provide my login details.
At this point I was instructed to enter my Facebook Username and password, put simply - I didn't need to sign up for any additional services in order to do this like other applications I've used in the past. Although, if you don't already have a Facebook username, you'll need to create one. That said, the instructions provided on how to create a Facebook username are fairly straight forward. Although, you'll need access to a computer to be able to perform this step.

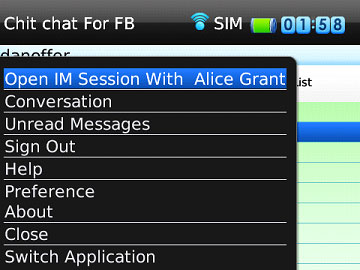
The menu button on your Blackberry allows you to select from a range of options, most of the options on this list you can more easily perform with keys on your blackberry, with one exception, preferences. The preference menu is only available via the menu button on your Blackberry.
Preferences is split into three sections - Conversation, Messages and Advanced. Dealing with the latter first, advanced preferences allows you to reset your settings as well as change your network configuration. More usefully, conversation and message preferences is home to a variety of functionality that enables you to customize the look and feel of this Blackberry Facebook chat software.
'Message preferences' includes the ability to change the wall paper, add the time to messages, sort the buddy list and change the text size. Functionality that you'd normally expect from a Windows application, but not necessarily from a Blackberry app. Some brownie points for Chit Chat here.
My favorite features of this app are the ability to filter your friends on the buddy list and the excellent message received alerts (it flashes the light on the Blackberry, vibrates and plays a jingle - although these can be turned off in preferences.
During my test I was able to stay logged into Facebook chat passively for several hours and then start using it actively without any issue arising. The Blackberry Facebook chat application feels solid and robust. One thing I felt was missing was the lack of the Facebook smiley's and them replaced with Chit Chat's own smiley graphics although that's probably a copyright thing more than anything else - there are substitutes for each of the Facebook emoticons .
In summary, Chit Chat for Facebook has moved from Windows to Blackberry in an elegant fashion. Chit Chat for Facebook (Blackberry) is a best in class instant messaging app for the Blackberry and is recommended if you wish to use Facebook chat on your Blackberry Smartphone. It's available from Mobihand for $1.99 at the time of writing.