Showing posts with label Windows. Show all posts

Wednesday, July 13, 2011

Windows 7 will not boot right? Learn how to recover


Created with Windows Vista, Startup Repair is even better in Windows 7. This tool is able to correct certain errors that prevent your operating system to be initialized, which usually happens by the absence of errors or system files. The tool does not fix hardware failures, errors such as hard disk or incompatible memory.

Startup Repair is located in the "System Recovery Options", where there are several diagnostic and recovery tools, and is only accessed before initialization, also known as boot.

Step 1. Before accessing the menu "System Recovery Options" on the computer, remove all floppy disks, CDs and DVDs and restart using the on / off switch. If you are using a Tablet PC or a touch a computer, connect a keyboard.

Step 2. If your computer has only one operating system installed, press the F8 key while the computer is restarted, this before the Windows logo appears. If your computer has more than one operating system, use the keyboard arrows to select the operating system you want to repair, holding down the F8 key.

Step 3. On the "Advanced Boot Options", select "Repair your computer" and press Enter on your keyboard. (If "Repair your computer" is not listed as an option, you do not have the recovery options pre-installed or your network administrator has turned off).
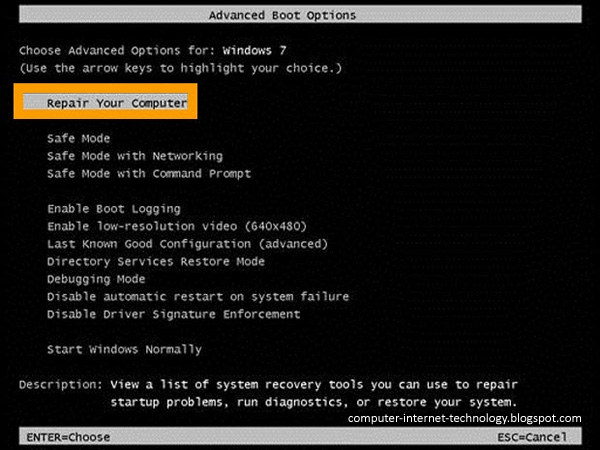
 
Step 4. Select your keyboard layout and click "Next" (Next). From the "System Recovery Options", click "Startup Repair" and when the computer finishes checking and correction, restart. The fix has been successful if Windows starts normally, without errors
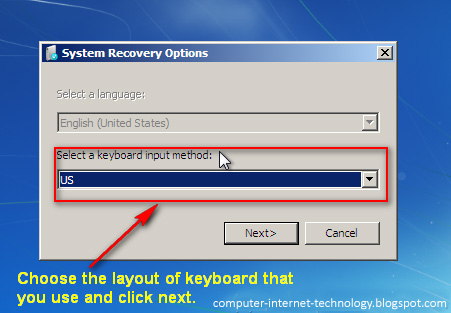
 

The following steps are only useful for those who need or prefer to recover using the Windows installation CD to repair the system. This will occur as needed when the computer is damaged to the point that you can not even access the menu "Options Windows Recovery."

Step 5. Insert the Windows installation disc. Restart your computer and watch the screen to boot from the CD. When prompted, press any key.

Step 6. After clicking on any key as requested in the previous step, you should get the screen of Windows Setup. Click on "Repair Computer".

Step 7. You will be directed to screen "System Recovery Options." Just select your language and click "next". Follow from Step 3, requesting a correction startup.

Step 8. The computer displays a screen with system errors recovered. After that, simply restart.

This is a rather useful and recommended when you encounter problems when you start Windows, but if these steps do not resolve, you probably need to format the drive and do a clean install of Windows , but worth a try. Always remember to keep up the backup of your most important files.

Windows 7 will not boot right? Learn how to recover


Created with Windows Vista, Startup Repair is even better in Windows 7. This tool is able to correct certain errors that prevent your operating system to be initialized, which usually happens by the absence of errors or system files. The tool does not fix hardware failures, errors such as hard disk or incompatible memory.

Startup Repair is located in the "System Recovery Options", where there are several diagnostic and recovery tools, and is only accessed before initialization, also known as boot.

Step 1. Before accessing the menu "System Recovery Options" on the computer, remove all floppy disks, CDs and DVDs and restart using the on / off switch. If you are using a Tablet PC or a touch a computer, connect a keyboard.

Step 2. If your computer has only one operating system installed, press the F8 key while the computer is restarted, this before the Windows logo appears. If your computer has more than one operating system, use the keyboard arrows to select the operating system you want to repair, holding down the F8 key.

Step 3. On the "Advanced Boot Options", select "Repair your computer" and press Enter on your keyboard. (If "Repair your computer" is not listed as an option, you do not have the recovery options pre-installed or your network administrator has turned off).
 
Step 4. Select your keyboard layout and click "Next" (Next). From the "System Recovery Options", click "Startup Repair" and when the computer finishes checking and correction, restart. The fix has been successful if Windows starts normally, without errors
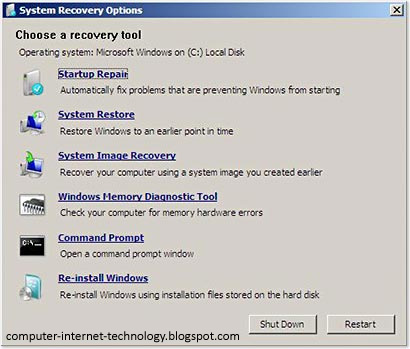
 

The following steps are only useful for those who need or prefer to recover using the Windows installation CD to repair the system. This will occur as needed when the computer is damaged to the point that you can not even access the menu "Options Windows Recovery."

Step 5. Insert the Windows installation disc. Restart your computer and watch the screen to boot from the CD. When prompted, press any key.

Step 6. After clicking on any key as requested in the previous step, you should get the screen of Windows Setup. Click on "Repair Computer".

Step 7. You will be directed to screen "System Recovery Options." Just select your language and click "next". Follow from Step 3, requesting a correction startup.

Step 8. The computer displays a screen with system errors recovered. After that, simply restart.

This is a rather useful and recommended when you encounter problems when you start Windows, but if these steps do not resolve, you probably need to format the drive and do a clean install of Windows , but worth a try. Always remember to keep up the backup of your most important files.

Saturday, May 21, 2011

How to Show Hidden Windows 7 Themes


One feature that is already widely known by users of Windows 7 is the Aero Theme. Microsoft offers the Aero Theme in accordance with the location where you live or called Aero Regional Themes. When you first install Windows 7, you will be asked to select the language, currency formats, and setting time of computer equipment.

Typically, most people chose Bahasa Indonesia (U.S.) as a regional default location of the computer device. This choice will also determine what the theme will be used as a default from the Windows 7. 

Actually, Aero Themes from other locations that are not selected as the default regional locations have also been installed on the computer. But most of us have never activate it. To enable Aero Theme from other regional locations, please follow the instructions and steps below:

1. Click the Start button menu. 
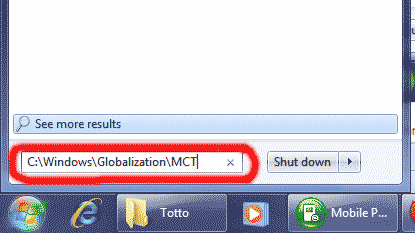
2. On the form or the Search box, type C: \ Windows \ Globalization \ MCT and then press Enter.


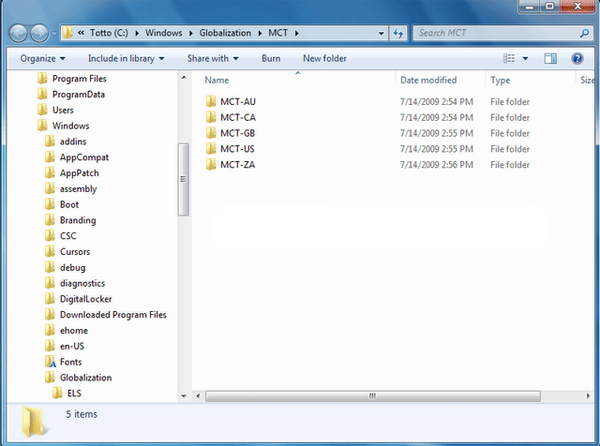
3. After that will open the Folder MCT. In Folder MCT, you will find some themes from other countries you've never use such as Australia (AU), Canada (CA), United Kingdom or Great Britain (UK), American or United States (U.S.) and South Africa. If Theme American or United States (U.S.), most of you already installed it. For in the Install Windows 7, most of you choose the language of Home (U.S.). So the theme is automatically installed.


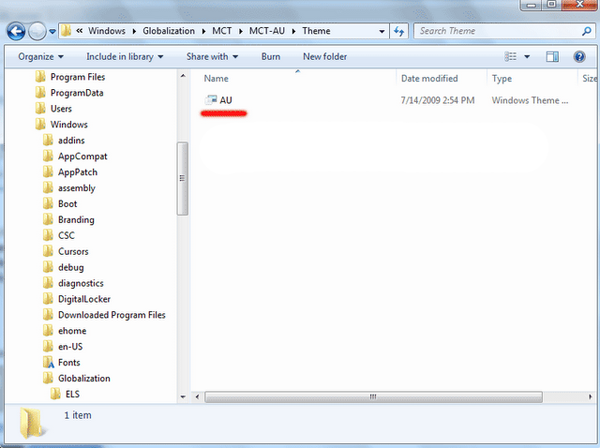
4. Try to open each folder, you'll see a lot wallaper that can be selected and used as Desktop Background. In addition, the theme in this folder can also be directly installed into the Personalize the way, open the Themes folder is located at each regional folder, then open or click left twice an existing theme files in the folder. For example, such as Theme below.


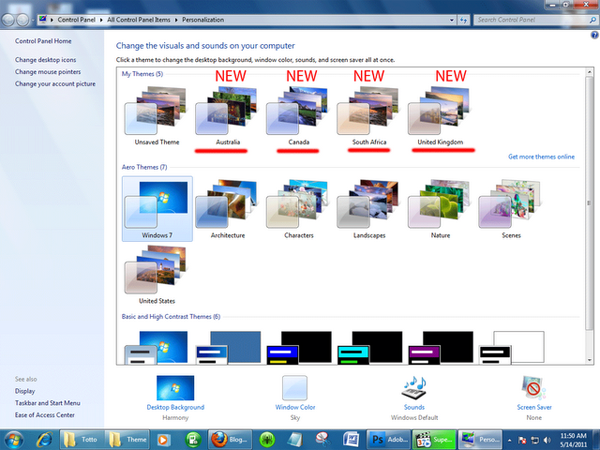
5. Now all that is hidden regional themes can already be accessed through the Personalize menu on the desktop.


Good luck. Best wishes. Beautify your desktop with default theme of Windows 7.
If you have trouble, please ask by commenting below. 
If you like this post don't forget subscribe or follow via twitter or facebook. Thank you

How to Show Hidden Windows 7 Themes


One feature that is already widely known by users of Windows 7 is the Aero Theme. Microsoft offers the Aero Theme in accordance with the location where you live or called Aero Regional Themes. When you first install Windows 7, you will be asked to select the language, currency formats, and setting time of computer equipment.

Typically, most people chose Bahasa Indonesia (U.S.) as a regional default location of the computer device. This choice will also determine what the theme will be used as a default from the Windows 7. 

Actually, Aero Themes from other locations that are not selected as the default regional locations have also been installed on the computer. But most of us have never activate it. To enable Aero Theme from other regional locations, please follow the instructions and steps below:

1. Click the Start button menu. 
2. On the form or the Search box, type C: \ Windows \ Globalization \ MCT and then press Enter.


3. After that will open the Folder MCT. In Folder MCT, you will find some themes from other countries you've never use such as Australia (AU), Canada (CA), United Kingdom or Great Britain (UK), American or United States (U.S.) and South Africa. If Theme American or United States (U.S.), most of you already installed it. For in the Install Windows 7, most of you choose the language of Home (U.S.). So the theme is automatically installed.


4. Try to open each folder, you'll see a lot wallaper that can be selected and used as Desktop Background. In addition, the theme in this folder can also be directly installed into the Personalize the way, open the Themes folder is located at each regional folder, then open or click left twice an existing theme files in the folder. For example, such as Theme below.


5. Now all that is hidden regional themes can already be accessed through the Personalize menu on the desktop.


Good luck. Best wishes. Beautify your desktop with default theme of Windows 7.
If you have trouble, please ask by commenting below. 
If you like this post don't forget subscribe or follow via twitter or facebook. Thank you

Monday, April 18, 2011

How to : Windows XP Taskbar fix "

The "taskbar" in Windows XP fix.
 
Solution 1:

  Right in the free area of the "Taskbar" click with -> check mark "in taskbar" fix by clicking on top.  To fix the "system tray" lift -> uncheck "lock taskbar" by clicking remove it.

  Solution 2:


  Use the right mouse button in the free area of the "system tray" or the "Start"    click -> Properties.  In the Properties window, taskbar and Start Menu "tab, if necessary," Taskbar "switch.  Fix "Set - Task Bar -> hook under the taskbar display" "at"> "OK" to confirm.  To fix the "system tray" lift - taskbar fix "to remove the hook from"> -> "OK" to confirm.

  Solution 3:

  "Windows key + R" to "run dialog" Open With "gpedit.msc" in the search field and click "OK" to confirm.  In the "Group Policy" select the following path:

  User Configuration -> Administrative Templates -> Start Menu and Taskbar "

  In the "Start Menu and Taskbar" fix "the" taskbar entry and search with a double click.  fix "in the Properties window, taskbar, the radio button to Enabled" set "->" OK "to confirm.  To fix the "system tray" lift - the radio button to "Not Configured" position> -> "OK" to confirm.  both cases, a "new start" to carry out in order to activate your changes.

  Note: "Lock the Taskbar" (solution 1 and 2) is "activating" solution 3 is grayed out when not clickable.
 
Solution 4:

  "Windows key + R" to "run dialog" Open With "regedit" in the search field and click "OK" to confirm.  In the "Registry Editor" following "key" to navigate to:

  HKEY_CURRENT_USER \ Software \ Microsoft \ Windows \ CurrentVersion \ Policies \ Explorer

  Right-click on the key "Explorer" -> "New" -> "DWORD Value.  The main window, newly created DWORD value in "LockTaskbar Rename.  Right-click on "LockTaskbar" -> "Change."  In the "Edit DWORD Value," the "value" to "1" Change -> "OK" to confirm.  To fix the "system tray" lift - the DWORD value "LockTaskbar" Delete>.  both cases, a "new start" to carry out in order to activate your changes.

How to : Windows XP Taskbar fix "

The "taskbar" in Windows XP fix.
 
Solution 1:

  Right in the free area of the "Taskbar" click with -> check mark "in taskbar" fix by clicking on top.  To fix the "system tray" lift -> uncheck "lock taskbar" by clicking remove it.

  Solution 2:


  Use the right mouse button in the free area of the "system tray" or the "Start"    click -> Properties.  In the Properties window, taskbar and Start Menu "tab, if necessary," Taskbar "switch.  Fix "Set - Task Bar -> hook under the taskbar display" "at"> "OK" to confirm.  To fix the "system tray" lift - taskbar fix "to remove the hook from"> -> "OK" to confirm.

  Solution 3:

  "Windows key + R" to "run dialog" Open With "gpedit.msc" in the search field and click "OK" to confirm.  In the "Group Policy" select the following path:

  User Configuration -> Administrative Templates -> Start Menu and Taskbar "

  In the "Start Menu and Taskbar" fix "the" taskbar entry and search with a double click.  fix "in the Properties window, taskbar, the radio button to Enabled" set "->" OK "to confirm.  To fix the "system tray" lift - the radio button to "Not Configured" position> -> "OK" to confirm.  both cases, a "new start" to carry out in order to activate your changes.

  Note: "Lock the Taskbar" (solution 1 and 2) is "activating" solution 3 is grayed out when not clickable.
 
Solution 4:

  "Windows key + R" to "run dialog" Open With "regedit" in the search field and click "OK" to confirm.  In the "Registry Editor" following "key" to navigate to:

  HKEY_CURRENT_USER \ Software \ Microsoft \ Windows \ CurrentVersion \ Policies \ Explorer

  Right-click on the key "Explorer" -> "New" -> "DWORD Value.  The main window, newly created DWORD value in "LockTaskbar Rename.  Right-click on "LockTaskbar" -> "Change."  In the "Edit DWORD Value," the "value" to "1" Change -> "OK" to confirm.  To fix the "system tray" lift - the DWORD value "LockTaskbar" Delete>.  both cases, a "new start" to carry out in order to activate your changes.

How to Windows Vista - "DNS cache" delete, clear

Clear DNS Cache in Windows Vista, empty.
 
Solution:

  "Windows key + R" to "run dialog" Open With "cmd" into the search box and "OK" to confirm.  the "Command Prompt" command line "ipconfig / flushdns" and enter in the "Enter" key to confirm.

Tip: "ipconfig / displaydns", the "DNS cache" before and checked it.
Publish Post

How to Windows Vista - "DNS cache" delete, clear

Clear DNS Cache in Windows Vista, empty.
 
Solution:

  "Windows key + R" to "run dialog" Open With "cmd" into the search box and "OK" to confirm.  the "Command Prompt" command line "ipconfig / flushdns" and enter in the "Enter" key to confirm.

Tip: "ipconfig / displaydns", the "DNS cache" before and checked it.
Publish Post

Windows Vista - Extended Context Menu "" Run

The Advanced menu in Windows Vista open call. Hidden messages, commands in the "context menu" Show.
Solution:

The "Shift" key (Shift key) while pressing the right mouse button on a file or folder, hold down. Thus, the following important commands for files and / or folders are visible:
  • Pin to Start Menu
  • Add to Quick Launch bar
  • Copy as Path
  • Open Command Window Here

Windows Vista - Extended Context Menu "" Run

The Advanced menu in Windows Vista open call. Hidden messages, commands in the "context menu" Show.
Solution:

The "Shift" key (Shift key) while pressing the right mouse button on a file or folder, hold down. Thus, the following important commands for files and / or folders are visible:
  • Pin to Start Menu
  • Add to Quick Launch bar
  • Copy as Path
  • Open Command Window Here

Windows 8 on a USB stick in your pocket

For Linux for years, of course, will now also be Windows, version 8 on USB flash drives bootable install.

An early copy of Windows these days 8 was leaked into the net. Windows 8 7850.0.winmain_win8m1.100922-1508 shows a number of new build proposed techniques. It should include a feature called Portable Workspaces, Windows Version 8 Enterprise will hold entry in the. In the leaked version says Microsoft: "Portable Workspace is a Windows feature that Allows you to run Windows from a USB storage device" users of the platform My Digital Life has the feature in Windows 8 Build investigated 7850.0 and found that at least 16 GB USB device is required. It is still unclear how portable workspaces works when it is set up once. Anyway, it will use cases for this feature to be enough, because when a fact is the rumor.


Windows 8 on a USB stick in your pocket

For Linux for years, of course, will now also be Windows, version 8 on USB flash drives bootable install.

An early copy of Windows these days 8 was leaked into the net. Windows 8 7850.0.winmain_win8m1.100922-1508 shows a number of new build proposed techniques. It should include a feature called Portable Workspaces, Windows Version 8 Enterprise will hold entry in the. In the leaked version says Microsoft: "Portable Workspace is a Windows feature that Allows you to run Windows from a USB storage device" users of the platform My Digital Life has the feature in Windows 8 Build investigated 7850.0 and found that at least 16 GB USB device is required. It is still unclear how portable workspaces works when it is set up once. Anyway, it will use cases for this feature to be enough, because when a fact is the rumor.


Saturday, June 7, 2008

Making Windows XP Start 60% Faster

Whenever you start your computer, you are faced with a few moments of thumb twiddling while Windows XP boots and prompts you to log on. Although you should expect to wait for a few moments, sometimes Windows XP seems to boot rather slowly. In fact, you may notice that over a period of time the PC that used to roar to life seems a bit sluggish instead. Fortunately, you can perform several techniques that help Windows XP get the bootup speed you want. This chapter explores how to put these techniques to work.

Making Windows XP Start 60% Faster

Whenever you start your computer, you are faced with a few moments of thumb twiddling while Windows XP boots and prompts you to log on. Although you should expect to wait for a few moments, sometimes Windows XP seems to boot rather slowly. In fact, you may notice that over a period of time the PC that used to roar to life seems a bit sluggish instead. Fortunately, you can perform several techniques that help Windows XP get the bootup speed you want. This chapter explores how to put these techniques to work.

Troubleshooting Windows XP

When Windows works properly, it's relatively easy to ignore; you can concentrate on the work you're trying to do and forget about the plumbing inside your computer. But when something goes wrong, it often requires an experienced guide to solve the problem and restore the computer to working condition. Everybody who uses Microsoft Windows eventually has to deal with cryptic error messages, frozen screens, and other more or less dramatic problems. Windows troubleshooting is the set of tools and techniques that can identify the source of a problem and find a solution.

It's Never Done That Before is a guide to Windows XP troubleshooting for people who don't spend their lives fixing computer problems. It includes basic troubleshooting techniques, specific instructions for solving the most common problems in Windows XP, and more general information for finding and fixing more obscure ones. It also provides pointers to explanations of BIOS beep codes and blue screen errors, instructions for using the troubleshooting tools supplied with Windows XP such as Safe Mode and the Recovery Console, and advice for dealing with device drivers, the ROM BIOS, and the Windows Registry. Viruses, spyware, and Internet connection problems are all included, along with advice for getting the most out of the Microsoft Knowledge base and other online information resources, and dealing with help desks and technical support centers.


From the Back Cover
Do some Windows XP problems make you scratch your head in wonder? Has an application suddenly chosen not to start or a piece of hardware simply stopped working? Ever had the Internet "disappear" or been faced with a Blue or Black Screen of Death? Do the neighbors call you to fix their machines when you’d really prefer to hand them a book so they can solve their own problems?

If you know enough about computers to use one but not always enough to fix those unexpected Windows problems, It’s Never Done That Before! is the book for you. It gives you:

• Troubleshooting techniques and tips for solving common XP problems

• Strategies for finding and fixing obscure It’s Never Done That Before! Problems

• Hints for troubleshooting BIOS beep codes and Blue Screen errors

• Help with XP’s troubleshooting tools (such as Safe Mode and the Recovery Console)

• Survival strategies for wrangling device drivers, the BIOS, and the Windows Registry

• Techniques for dealing with viruses, spyware, and Internet problems

• Advice for getting the most out of the Microsoft Knowledge Base and other online resources, plus tips for dealing with technical support

Got Windows problems? You’re not alone. Reach for It’s Never Done That Before!—the lifeline you’ll grab when your computer does something you didn’t expect it to do.

  • 264 pages
  • Publisher: No Starch Press (May 19, 2006)
  • ISBN-10: 1593270763
  • ISBN-13: 978-1593270766

Troubleshooting Windows XP

When Windows works properly, it's relatively easy to ignore; you can concentrate on the work you're trying to do and forget about the plumbing inside your computer. But when something goes wrong, it often requires an experienced guide to solve the problem and restore the computer to working condition. Everybody who uses Microsoft Windows eventually has to deal with cryptic error messages, frozen screens, and other more or less dramatic problems. Windows troubleshooting is the set of tools and techniques that can identify the source of a problem and find a solution.

It's Never Done That Before is a guide to Windows XP troubleshooting for people who don't spend their lives fixing computer problems. It includes basic troubleshooting techniques, specific instructions for solving the most common problems in Windows XP, and more general information for finding and fixing more obscure ones. It also provides pointers to explanations of BIOS beep codes and blue screen errors, instructions for using the troubleshooting tools supplied with Windows XP such as Safe Mode and the Recovery Console, and advice for dealing with device drivers, the ROM BIOS, and the Windows Registry. Viruses, spyware, and Internet connection problems are all included, along with advice for getting the most out of the Microsoft Knowledge base and other online information resources, and dealing with help desks and technical support centers.


From the Back Cover
Do some Windows XP problems make you scratch your head in wonder? Has an application suddenly chosen not to start or a piece of hardware simply stopped working? Ever had the Internet "disappear" or been faced with a Blue or Black Screen of Death? Do the neighbors call you to fix their machines when you’d really prefer to hand them a book so they can solve their own problems?

If you know enough about computers to use one but not always enough to fix those unexpected Windows problems, It’s Never Done That Before! is the book for you. It gives you:

• Troubleshooting techniques and tips for solving common XP problems

• Strategies for finding and fixing obscure It’s Never Done That Before! Problems

• Hints for troubleshooting BIOS beep codes and Blue Screen errors

• Help with XP’s troubleshooting tools (such as Safe Mode and the Recovery Console)

• Survival strategies for wrangling device drivers, the BIOS, and the Windows Registry

• Techniques for dealing with viruses, spyware, and Internet problems

• Advice for getting the most out of the Microsoft Knowledge Base and other online resources, plus tips for dealing with technical support

Got Windows problems? You’re not alone. Reach for It’s Never Done That Before!—the lifeline you’ll grab when your computer does something you didn’t expect it to do.

  • 264 pages
  • Publisher: No Starch Press (May 19, 2006)
  • ISBN-10: 1593270763
  • ISBN-13: 978-1593270766

Make your computer dual-boot Vista and XP

Make your computer dual-boot Vista and XP


Make your computer dual-boot Vista and XP

It's getting harder to buy a new computer with Windows XP installed and — after Microsoft stops selling XP on June 30, 2008 — it will become nearly impossible.

Fortunately, you can have your XP cake and eat your Vista, too, by setting up your system to boot between the two operating systems.

Add an XP option to your new Vista system


If a new computer arrived in your recent past, or you plan to buy one in the near future, chances are it will come with Windows Vista installed. Although some manufacturers still give you the option of getting XP on your new system, that option is likely to dry up for most consumers later this year when Microsoft stops selling Windows XP.

If you're not ready to dive into Vista all at once, there is an answer: set up your Vista computer to dual-boot between Vista and XP.

In this article, I'll tell you how to make your PC give you a choice between Vista and XP every time you start up. In a separate article coming soon, I'll give you some additional tips that save disk space on a dual-boot system.

Although some sources, such as Computer Shopper Magazine, advise that you need an add-on product like VistaBootPro to dual-boot, you can accomplish the same thing without any additional software other than the two operating systems.

Before starting, make sure you have your Windows XP install discs ready as well as your Windows Vista DVD. In addition, it's a good idea to make a complete system backup before beginning an operation like this.

Once you've laid that groundwork, you're ready to go to work:

Step 1. In Vista, click Start, type diskmgmt.msc, and press Enter. Click Continue if prompted by User Account Control.

Step 2. Right-click a drive and choose Shrink Volume. Specify the amount to shrink, which in this case is the amount you want for your XP partition. At a minimum, you'll need around 2.5GB for XP Pro SP2. I suggest you select a larger partition to leave room for updates and other files that may need to be on the same drive as XP. Because I wanted a 5GB partition, I typed 5000 (representing 5,000 megabytes) in the available box. Click Shrink.

Step 3. Right-click the newly available area and choose New Simple Volume. Follow the steps in the wizard to assign a drive letter now, or wait until the next step. When prompted, check Perform a quick format to format the volume with NTFS.

Step 4. When the wizard is done formatting the new volume, you can assign or rearrange drive letters as needed. For example, changing drive letters may also put your CD/DVD drive in a more logical order.

To do that, right-click a volume or the CD/DVD drive and choose Change Drive Letters and Paths. If a volume hasn't got a drive letter yet, click Add. Otherwise, select the drive icon in the dialog box and click Change.

If you're rearranging the letters on existing drives, you may need to change the drives in a particular order. Or you may need to give a drive a temporary letter (such as Z) to free up a letter for another drive; you would change the Z drive to something else later. Make your selection and click OK. Repeat for other partitions or drives until you have the order you want.

Step 5. When you're done with your partitioning chores, exit Disk Management. Insert your XP disc into the drive and restart your system, booting from that disk.

Step 6. Follow the steps to install XP. When asked for the target drive, select your new partition and press Enter. Because you already formatted this partition with NTFS, you can skip the formatting step. At the appropriate screen, arrow down to Leave the current file system intact (no changes) and press Enter. Continue the installation process until it's finished and XP has started.

Step 7. Your system now boots to XP, so we'll need to do some fixing to set up a boot menu. Insert your Vista DVD and restart the computer from it. Click Next in the first screen.

Step 8. Don't click Install when prompted! Instead, click Repair Your Computer in the lower-left corner.

Step 9. When the System Recovery Options dialog appears, make sure Microsoft Windows Vista is selected and click Next. In the next dialog box, select the Command Prompt option at the bottom.

Step 10. In the command-prompt window, type the following commands and press Enter after each one:

bootrec.exe /fixMBR
bootrec.exe /fixBoot

Step 11. Close the command prompt and click Restart.

Step 12. When your computer has booted into Vista, click Start, type cmd.exe, and press Ctrl+Shift+Enter to make the command window open with elevated privileges. Click Continue, if prompted by User Account Control.

Step 13. Type the following commands in the command window, one at at time, pressing Enter after each one. After each command, you should get the response, "The operation completed successfully." A response of, "The specified entry already exists," is OK, too. If not, retype your command to make sure you've entered it correctly. If Vista is installed on a drive other than c:, change the first command below to use the proper drive letter. The curly braces around {ntldr} in each command must be typed exactly as shown:

bcdedit -set {ntldr} device partition=C:
bcdedit -set {ntldr} path \ntldr
bcdedit -displayorder {ntldr} -addlast
bcdedit -set {ntldr} description "Microsoft Windows XP"

That's it! The next time you restart your system, you should be see a prompt that will let you choose between Vista or XP. Select the one you want and press Enter.

How to customize your boot menu

When you start your dual-boot system, the menu will appear for a few seconds. If you don't press any keys, eventually Windows Vista will start. Fortunately, you can change this if you don't want Vista to be your default operating system. You can also customize the waiting period before the default kicks in.

Here's what to do:

Step 1. Click Start. Type systempropertiesadvanced and press Enter. Click Continue, if prompted by User Account Control.

Step 2. Under Startup and Recovery, click Settings.

Step 3. At the top of the dialog box, select the operating system you want to start by default.

Step 4. In the box to the right of Time to display list of operating systems, specify the number of seconds for the options to stay on screen. Click OK.

Microsoft provides documentation of Vista's bcdedit command and its parameters in an article in the Windows Vista Technical Library.

Having two operating systems on the same computer definitely takes a little extra disk space. In a future column, I'll show you some ways to make the two operating systems share some common resources to save on storage.

Make your computer dual-boot Vista and XP

Make your computer dual-boot Vista and XP


Make your computer dual-boot Vista and XP

It's getting harder to buy a new computer with Windows XP installed and — after Microsoft stops selling XP on June 30, 2008 — it will become nearly impossible.

Fortunately, you can have your XP cake and eat your Vista, too, by setting up your system to boot between the two operating systems.

Add an XP option to your new Vista system


If a new computer arrived in your recent past, or you plan to buy one in the near future, chances are it will come with Windows Vista installed. Although some manufacturers still give you the option of getting XP on your new system, that option is likely to dry up for most consumers later this year when Microsoft stops selling Windows XP.

If you're not ready to dive into Vista all at once, there is an answer: set up your Vista computer to dual-boot between Vista and XP.

In this article, I'll tell you how to make your PC give you a choice between Vista and XP every time you start up. In a separate article coming soon, I'll give you some additional tips that save disk space on a dual-boot system.

Although some sources, such as Computer Shopper Magazine, advise that you need an add-on product like VistaBootPro to dual-boot, you can accomplish the same thing without any additional software other than the two operating systems.

Before starting, make sure you have your Windows XP install discs ready as well as your Windows Vista DVD. In addition, it's a good idea to make a complete system backup before beginning an operation like this.

Once you've laid that groundwork, you're ready to go to work:

Step 1. In Vista, click Start, type diskmgmt.msc, and press Enter. Click Continue if prompted by User Account Control.

Step 2. Right-click a drive and choose Shrink Volume. Specify the amount to shrink, which in this case is the amount you want for your XP partition. At a minimum, you'll need around 2.5GB for XP Pro SP2. I suggest you select a larger partition to leave room for updates and other files that may need to be on the same drive as XP. Because I wanted a 5GB partition, I typed 5000 (representing 5,000 megabytes) in the available box. Click Shrink.

Step 3. Right-click the newly available area and choose New Simple Volume. Follow the steps in the wizard to assign a drive letter now, or wait until the next step. When prompted, check Perform a quick format to format the volume with NTFS.

Step 4. When the wizard is done formatting the new volume, you can assign or rearrange drive letters as needed. For example, changing drive letters may also put your CD/DVD drive in a more logical order.

To do that, right-click a volume or the CD/DVD drive and choose Change Drive Letters and Paths. If a volume hasn't got a drive letter yet, click Add. Otherwise, select the drive icon in the dialog box and click Change.

If you're rearranging the letters on existing drives, you may need to change the drives in a particular order. Or you may need to give a drive a temporary letter (such as Z) to free up a letter for another drive; you would change the Z drive to something else later. Make your selection and click OK. Repeat for other partitions or drives until you have the order you want.

Step 5. When you're done with your partitioning chores, exit Disk Management. Insert your XP disc into the drive and restart your system, booting from that disk.

Step 6. Follow the steps to install XP. When asked for the target drive, select your new partition and press Enter. Because you already formatted this partition with NTFS, you can skip the formatting step. At the appropriate screen, arrow down to Leave the current file system intact (no changes) and press Enter. Continue the installation process until it's finished and XP has started.

Step 7. Your system now boots to XP, so we'll need to do some fixing to set up a boot menu. Insert your Vista DVD and restart the computer from it. Click Next in the first screen.

Step 8. Don't click Install when prompted! Instead, click Repair Your Computer in the lower-left corner.

Step 9. When the System Recovery Options dialog appears, make sure Microsoft Windows Vista is selected and click Next. In the next dialog box, select the Command Prompt option at the bottom.

Step 10. In the command-prompt window, type the following commands and press Enter after each one:

bootrec.exe /fixMBR
bootrec.exe /fixBoot

Step 11. Close the command prompt and click Restart.

Step 12. When your computer has booted into Vista, click Start, type cmd.exe, and press Ctrl+Shift+Enter to make the command window open with elevated privileges. Click Continue, if prompted by User Account Control.

Step 13. Type the following commands in the command window, one at at time, pressing Enter after each one. After each command, you should get the response, "The operation completed successfully." A response of, "The specified entry already exists," is OK, too. If not, retype your command to make sure you've entered it correctly. If Vista is installed on a drive other than c:, change the first command below to use the proper drive letter. The curly braces around {ntldr} in each command must be typed exactly as shown:

bcdedit -set {ntldr} device partition=C:
bcdedit -set {ntldr} path \ntldr
bcdedit -displayorder {ntldr} -addlast
bcdedit -set {ntldr} description "Microsoft Windows XP"

That's it! The next time you restart your system, you should be see a prompt that will let you choose between Vista or XP. Select the one you want and press Enter.

How to customize your boot menu

When you start your dual-boot system, the menu will appear for a few seconds. If you don't press any keys, eventually Windows Vista will start. Fortunately, you can change this if you don't want Vista to be your default operating system. You can also customize the waiting period before the default kicks in.

Here's what to do:

Step 1. Click Start. Type systempropertiesadvanced and press Enter. Click Continue, if prompted by User Account Control.

Step 2. Under Startup and Recovery, click Settings.

Step 3. At the top of the dialog box, select the operating system you want to start by default.

Step 4. In the box to the right of Time to display list of operating systems, specify the number of seconds for the options to stay on screen. Click OK.

Microsoft provides documentation of Vista's bcdedit command and its parameters in an article in the Windows Vista Technical Library.

Having two operating systems on the same computer definitely takes a little extra disk space. In a future column, I'll show you some ways to make the two operating systems share some common resources to save on storage.

Change the product key on Windows XP

For most Microsoft Windows XP installs, you’ll never need to worry about the validity of the product key assigned to your copy of the OS. However, software does tend to get installed without authorization, even in the most carefully managed shops, and so from time to time you may need to reset the Windows XP product key.
For example, perhaps a user installed a pirated copy of XP but now wants to go legal. Maybe you’ve been hired by an organization that installed 100 pirated copies of XP but now has a legitimate volume-licensing key (VLK). Perhaps an end user purchased an additional retail license for XP but needs to use his original CD to install the software. When situations like these arise, changing XP’s product key is often the most practical-or only-solution.

Determining if you have a valid product ID

Hopefully you already know if you’re dealing with a pirated copy of XP. But if you’re unsure, a quick way to tell is to install Service Pack 1. Shortly after releasing Windows XP, Microsoft realized that most pirated XP installations were using two specific VLKs, the most popular of which begins with “FCKGW.” These VLKs produce product IDs that match either XXXXX-640-0000356-23XXX or XXXXX-640-2001765-23XXX, where X is any number.
If you try to install SP1 and get the following error message:
The Product Key used to install Windows is invalid. Please contact your system administrator or retailer immediately to obtain a valid Product Key…”
You are dealing with a pirated copy of Windows. For more information about obtaining a valid product key, see Microsoft Knowledge Base article 326904.
You can also directly check the operating system’s product ID by right-clicking on My Computer, clicking Properties, and selecting the General tab. The machine’s product ID will be located under the Registered To section. If the ID matches either of the two models commonly associated with VLK fraud, you’ll need to obtain a valid XP product key before proceeding. None of the procedures described below will work without a legitimate product key.
Two methods of changing Windows XP’s product key

You can change a Windows XP installation’s product key either by editing the registry or by using one of two Windows Management Instrumentation (WMI) scripts. The registry editing method is outlined in Knowledge Base articles 321636 and 328874 and works on Windows XP Home, Windows XP Professional, and Windows XP Corporate Edition.
The script method is outlined in article 328874 and is designed to work on Corporate Edition installations that use a VLK and do not require activation. It may work on a Home or Professional installation, but I have not tested this scenario.
The script method is the practical solution for changing the product keys on a large number of machines. Regardless of the method you choose, make sure to backup important data before changing a product ID, since an unexpected problem could render the machine unbootable and necessitate a complete reinstallation of Windows.
Warning

The following instructions involve editing your system registry. Using the Windows Registry Editor incorrectly can cause serious problems that require the reinstallation of your operating system and possible loss of data. TechRepublic does not support problems that arise from editing your registry. Use the Registry Editor and the following directions at your own risk.
Editing the registry

Begin by opening the Registry Editor and navigating to
HKEY_LOCAL_MACHINESoftwareMicrosoftWindowsNTCurren t VersionWPAEvents In the right pane, right-click the ODBETimer binary value and select Modify. Change at least one character of this value to either a number from 0 to 9 or to a letter from A to F, then click OK and close the Registry Editor. This renders the current product key invalid and deactivates Windows.
Now, it’s time to reactivate Windows using your new product key. Click Start | Run and enter the command:
%systemroot%system32oobemsoobe /a where %systemroot% is your Windows directory. In many cases, this command will look like:
C:windowssystem32oobemsoobe.exe /a At this point, Windows will launch the Product Activation Wizard.

Product Activation Wizard

Select the option to telephone a Microsoft customer service representative to activate Windows, as shown in Figure A, and click Next. Now, select the Change Product Key option and enter your new product key as shown in Figure B. Finally, click Update and close the window. If Windows returns you to the previous screen, just select the Remind Me Later option. When the wizard is finished, reboot the system.
Figure B


Enter new product key

When Windows reboots, your next step will depend on which Windows XP version you are using. If you have XP Home or Professional, you’ll be prompted to reactivate your copy of Windows through the normal activation process. If you have XP Corporate, no activation is required and your machine should have a valid product ID. You can verify this by running the %systemroot%\system32\oobe\msoobe.exe /a command again. When the wizard loads this time, you should see a message indicating that your copy of Windows has already been activated.
Using a WMI script

Although the registry editing process is effective, it can be tedious and impractical if you need to change the product key on more than a few machines. So Microsoft provides two WMI scripts, one for XP machines with SP1 and one for XP machines without SP1.
  1. View the code for the WMI script, ChangeVLKey2600.vbs, designed for use on XP machines without SP1.
  2. View the code for the WMI script, ChangeVLKeySP1.vbs, for XP machines with SP1 already installed.
Copy the appropriate script’s code into a text file and save it as either ChangeVLKey2600.vbs or ChangeVLKeySP1.vbs. The scripts can act in conjunction with a valid product key as part of a login script to change the product ID on multiple machines. You can also execute the script from the command line to change the key on a single computer.
For example, if you wanted to change the product key on an XP machine without SP1 and had already saved the script to root directory on the C: drive, you would click Start | Run and enter the following command:
C:changevlkey2600.vbs xxxxx-xxxxx-xxxxx-xxxxx-xxxxx Of course, xxxxx-xxxxx-xxxxx-xxxxx-xxxxx in this scenario is a valid product key.
The script should take only a few seconds to run and won’t prompt you for further action unless there’s a problem, such as an invalid product key. As with the registry editing method, you can verify that Windows is now using a valid product key by running the command:
%systemroot%system32oobemsoobe.exe /a The Product Activation Wizard will load and should tell you that your copy of Windows has already been activated. More

Change the product key on Windows XP

For most Microsoft Windows XP installs, you’ll never need to worry about the validity of the product key assigned to your copy of the OS. However, software does tend to get installed without authorization, even in the most carefully managed shops, and so from time to time you may need to reset the Windows XP product key.
For example, perhaps a user installed a pirated copy of XP but now wants to go legal. Maybe you’ve been hired by an organization that installed 100 pirated copies of XP but now has a legitimate volume-licensing key (VLK). Perhaps an end user purchased an additional retail license for XP but needs to use his original CD to install the software. When situations like these arise, changing XP’s product key is often the most practical-or only-solution.

Determining if you have a valid product ID

Hopefully you already know if you’re dealing with a pirated copy of XP. But if you’re unsure, a quick way to tell is to install Service Pack 1. Shortly after releasing Windows XP, Microsoft realized that most pirated XP installations were using two specific VLKs, the most popular of which begins with “FCKGW.” These VLKs produce product IDs that match either XXXXX-640-0000356-23XXX or XXXXX-640-2001765-23XXX, where X is any number.
If you try to install SP1 and get the following error message:
The Product Key used to install Windows is invalid. Please contact your system administrator or retailer immediately to obtain a valid Product Key…”
You are dealing with a pirated copy of Windows. For more information about obtaining a valid product key, see Microsoft Knowledge Base article 326904.
You can also directly check the operating system’s product ID by right-clicking on My Computer, clicking Properties, and selecting the General tab. The machine’s product ID will be located under the Registered To section. If the ID matches either of the two models commonly associated with VLK fraud, you’ll need to obtain a valid XP product key before proceeding. None of the procedures described below will work without a legitimate product key.
Two methods of changing Windows XP’s product key

You can change a Windows XP installation’s product key either by editing the registry or by using one of two Windows Management Instrumentation (WMI) scripts. The registry editing method is outlined in Knowledge Base articles 321636 and 328874 and works on Windows XP Home, Windows XP Professional, and Windows XP Corporate Edition.
The script method is outlined in article 328874 and is designed to work on Corporate Edition installations that use a VLK and do not require activation. It may work on a Home or Professional installation, but I have not tested this scenario.
The script method is the practical solution for changing the product keys on a large number of machines. Regardless of the method you choose, make sure to backup important data before changing a product ID, since an unexpected problem could render the machine unbootable and necessitate a complete reinstallation of Windows.
Warning

The following instructions involve editing your system registry. Using the Windows Registry Editor incorrectly can cause serious problems that require the reinstallation of your operating system and possible loss of data. TechRepublic does not support problems that arise from editing your registry. Use the Registry Editor and the following directions at your own risk.
Editing the registry

Begin by opening the Registry Editor and navigating to
HKEY_LOCAL_MACHINESoftwareMicrosoftWindowsNTCurren t VersionWPAEvents In the right pane, right-click the ODBETimer binary value and select Modify. Change at least one character of this value to either a number from 0 to 9 or to a letter from A to F, then click OK and close the Registry Editor. This renders the current product key invalid and deactivates Windows.
Now, it’s time to reactivate Windows using your new product key. Click Start | Run and enter the command:
%systemroot%system32oobemsoobe /a where %systemroot% is your Windows directory. In many cases, this command will look like:
C:windowssystem32oobemsoobe.exe /a At this point, Windows will launch the Product Activation Wizard.

Product Activation Wizard

Select the option to telephone a Microsoft customer service representative to activate Windows, as shown in Figure A, and click Next. Now, select the Change Product Key option and enter your new product key as shown in Figure B. Finally, click Update and close the window. If Windows returns you to the previous screen, just select the Remind Me Later option. When the wizard is finished, reboot the system.
Figure B


Enter new product key

When Windows reboots, your next step will depend on which Windows XP version you are using. If you have XP Home or Professional, you’ll be prompted to reactivate your copy of Windows through the normal activation process. If you have XP Corporate, no activation is required and your machine should have a valid product ID. You can verify this by running the %systemroot%\system32\oobe\msoobe.exe /a command again. When the wizard loads this time, you should see a message indicating that your copy of Windows has already been activated.
Using a WMI script

Although the registry editing process is effective, it can be tedious and impractical if you need to change the product key on more than a few machines. So Microsoft provides two WMI scripts, one for XP machines with SP1 and one for XP machines without SP1.
  1. View the code for the WMI script, ChangeVLKey2600.vbs, designed for use on XP machines without SP1.
  2. View the code for the WMI script, ChangeVLKeySP1.vbs, for XP machines with SP1 already installed.
Copy the appropriate script’s code into a text file and save it as either ChangeVLKey2600.vbs or ChangeVLKeySP1.vbs. The scripts can act in conjunction with a valid product key as part of a login script to change the product ID on multiple machines. You can also execute the script from the command line to change the key on a single computer.
For example, if you wanted to change the product key on an XP machine without SP1 and had already saved the script to root directory on the C: drive, you would click Start | Run and enter the following command:
C:changevlkey2600.vbs xxxxx-xxxxx-xxxxx-xxxxx-xxxxx Of course, xxxxx-xxxxx-xxxxx-xxxxx-xxxxx in this scenario is a valid product key.
The script should take only a few seconds to run and won’t prompt you for further action unless there’s a problem, such as an invalid product key. As with the registry editing method, you can verify that Windows is now using a valid product key by running the command:
%systemroot%system32oobemsoobe.exe /a The Product Activation Wizard will load and should tell you that your copy of Windows has already been activated. More